Thursday, September 30, 2010

My First Encounter With A Jalepeno In My Kitchen


I have always been afraid of cooking with jalepenos (or any spicy pepper).  When they have come up in recipes I always omit them.  But the other day when I was grocery shopping I decided to go for it.  So I added a jalepeno, a lime, and an onion to my cart. 
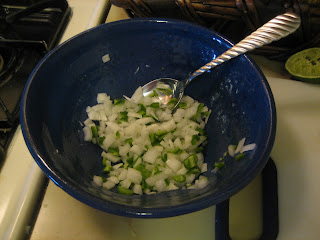
In other Kit Kat Crafting crafting, please note I made this bowl in Ceramics in college!

However, I forgot the key ingredients of pico de gallo: TOMATOES and cilantro. 
I don't know what I was thinking.

So today I walked to the local market and bought roma tomatoes and cilantro.


 Results: Sadly I didn't like my homemade pico de gallo as much as I like Trader Joe's.  I think this is because I didn't chop my tomatoes small enough and my ingredients weren't very high quality.  But I am no longer afraid of working with spicy peppers (though I am still very nervous about taking my contacts out tonight.  I should invest in some latex gloves).  So, win.

I followed a recipe from The Pioneer Woman.  I scaled it down though and used:

1 jalepeno
1/4 of an onion
2.5 small roma tomatoes
half of a small bundle of cilantro
juice of 1/2 lime
a sprinkle of salt.

Here is what we ate it with:
The other half of the Mexican Vegetarian Casserole that I made a week and a half ago and froze!  It was very yummy, though even juicier than the unfrozen version so I had to let it cook even longer.  Next time I make it I'm definitely omitting the can of diced tomatoes!  It just makes it too juice and there are already tomatoes from the salsa.

Wednesday, September 29, 2010

Easy Cinnamon Roll Biscuits


 I mentioned the other day that I wanted to try these Sweet Cinnamon Biscuits.  Well this morning I made them since I my Dad and brother were coming over.  This way I wouldn't end up eating half the pan myself.

Dear God.  The deliciousness.  And the simplicity!  I have made these Cinnabon Cinnamon Rolls before and while they are the most amazing cinnamon rolls I've ever had, they also take forever to make and are quite the production.

But these biscuit cinnamon rolls are really speedy to put together because there is no rising involved!  And they taste really really really good.  Especially when you slather on some Cinnabon icing!  I think they took me about 20 minutes to make.  And then they only baked for 13 minutes!  That is dangerously fast.

So here is the recipe and a few pictures.  I'm posting what I did since I reduced the butter and sugar and added icing.  Oh and changing the name because I think it's much more appropriate.

Easy Cinnamon Roll Biscuits
 2 cups flour
1 tablespoon baking powder
1 teaspoon salt
1/4 teaspoon baking soda
1/4 cup applesauce (I never use vegetable oil)
3/4 cup buttermilk
70% of a stick of unsalted butter, SOFTENED (reduced from 1 stick in the original recipe)
2/3 cup granulated sugar (next time I'm going to try 1/2 cup brown sugar instead)
1 1/4 teaspoons cinnamon


Cinnabon Icing- I halved the original recipe since the above recipe only makes 8 biscuits
30% of a stick of butter (reduced from 1/2 stick in the original recipe, I'm trying to shave calories & fat here and there)
3/4 cups powdered sugar
1/8 cup Neufchatel cream cheese (I didn't taste a difference with the reduced fat)
1/4 teaspoon vanilla
sprinkle of salt (technically should be 1/16 of a teaspoon, but....)

1. Preheat oven to 400 degrees.  Grease a 9 inch round baking dish lightly (I used Pam).

2. Mix together the first four ingredients.  Add in the applesauce and buttermilk until nicely combined.

3. Roll dough out into a 15 x 8 inch rectangle (I didn't measure mine).

4. Spread SOFTENED butter onto the dough.  (If you are impatient like me this will be a very difficult step).

5.  Mix together sugar and cinnamon in a small bowl.  Sprinkle mixture evenly over buttery dough.

6. Roll up rectangle, jelly roll style.  Pinch seam together.

7.  Cut biscuits off of the giant roll to about 1 1/2 inches thick.  Arrange in greased pan.

I added butter to the top since I used so much less on the dough than called for.  Next time I won't do this cause it wasn't necessary in the end.

8.  Bake for about 15 minutes. Then you get these:


9. To make icing: Mix together all ingredients until fluffy.  Spread over biscuits while they are STILL WARM so that it melts into the dough.  Yummmm!

You might notice once the icing was on the biscuits immediately disappeared before they could even be photographed.

Tuesday, September 28, 2010

Non Food-Related Crafting! A Tooth Pillow

 
My nephew D- is in first grade now which means he could lose a tooth any day now.  Or he could be like me and not lose a single tooth until second grade.  When I was little we had a little pillow that looked like a hippo and the hippo's teeth were pockets.  When I lost a tooth I put my tooth in the hippo's tooth pocket for the Tooth Fairy.  So I wanted to make a tooth pillow for my nephew.  He said he wanted his pillow to look like an actual tooth.

I went to the fabric store with him and he picked out a light pink cotton flannel fabric (my favorite quilting fabric).  Then I found a tooth template.  I sketched out a tooth while looking at that as a reference.  I cut the first piece around my original outline so I would have a seam allowance.  Then I flipped it upside down and used it as a template for the second piece of the pillow.


I decided to challenge myself and make the pocket for his teeth look like another tiny tooth instead of just a square or a semi-circle. 

It took me awhile to decide how to attach it, but I ended up deciding to simply sew it on with a straight stitch and then embroider it later to hide the ugly stiches.
Those scissors are my favorite sewing scissors.  They are sharp, tiny, & pointy and also serve as my seam ripper.


Then I pinned & sewed the two pieces together (pretty sides facing each other) while following my sketched outline.


Sunday, September 26, 2010

Broccoli Cheese Wild Rice Casserole

 
I invented this recipe myself when I lived in my first apartment in college.  I have always enjoyed cooking and cooked a fair bit in high school, but I really got into it once I was responsible for all of my own food.  This is a good recipe to modify based on your own likings, leftovers, and current pantry holdings.


I served this with the rest of the buttery biscuits that I made to serve with the Tuscan White Bean Soup.


Broccoli Cheese Wild Rice Casserole
1 box Uncle Ben's wild rice
1 can cream of celery soup
1 can cannelini/white bean/navy beans, DRAINED & rinsed
1 broccoli tree, diced up to be bite-size, about 2 cups (use as much of the stem as you like, in a casserole it's easy to sneak in lots of stem along with the florets)
some frozen spinach, drained & chopped - I include this whenever I happen to have some in the freezer
1 cup shredded cheddar cheese (I always use white cheddar)
1/4 cup grated fresh parmesan
1/8 stick of butter
1/3 cup chopped onions
2 cloves garlic, minced (about 1 tablespoon)
sprinkle of cayenne pepper
cheese to sprinkle on top

Here is everything you need all together!


1. Make wild rice according to package directions.  Preheat oven to 350.
I like Uncle Ben's wild rice because it comes with a seasoning packet which is very delicious.

Saturday, September 25, 2010

Scrumptious Buttery Biscuits

Two days ago I made plain biscuits (once we had finished all of the cheddar biscuits and had a few days to be biscuit-free).  Then yesterday I made even more plain biscuits.  THEY WERE SO DELICIOUS!  Scrumptious, really.  They are good plain.  They are good with some butter.  They are REALLY good with a bit of strawberry jam spread in the middle.  And I bet they're really good with a bit of honey, too.

The first time I made them I forgot that I used salted butter so I put in the salt that the recipe called for.  The biscuits were a tad salty, but still very yummy.  The second time I made them I used salted butter and omitted the salt the recipe called for.  The biscuits were a tad sweet, but still very yummy.  Next time I make them I will use salted butter and then just a smidgen of salt.  I feel like Goldilocks.

The second time I made the plain biscuits I actually rolled them out and cut out the biscuits using the top of a glass.  So these ones actually look more like a traditional biscuit.  Look:

And finally, here is the recipe!  Courtesy of food.com

Buttery Biscuits
2 cups flour
4 teaspoons baking powder
2 tablespoons sugar
1 teaspoon salt (OMIT IF USING SALTED BUTTER)
1/3 cup cold unsalted butter
3/4 cup cold milk


1.  Mix the first 4 ingredients together.

2.  Cut the cold butter into tiny little cubes.  Cut the butter into the flour mixture using a pastry cutter until crumbly.  (Or do what I do and use your KitchenAid mixer with the paddle attachment which has been working fine for me.)

3. Mix in the cold milk.  

4. Roll or pat out the dough to 1 inch.

5. Using the top of a glass (or a biscuit cutter if you're fancy like that) cut out your biscuits.  You should get 12 biscuits but this will vary with your glass size.

6. Arrange on a baking sheet lined with parchment paper.

7. Bake at 425 for 10-12 minutes until lightly browned.


And while I'm still in biscuit mode, check out these Sweet Cinnamon Biscuits!  They're like "healthier" (I'm using that term very loosely) cinnamon rolls!  I'm going to make these next weekend. 

Friday, September 24, 2010

Vegetable Fried Rice


My boyfriend also likes baking and cooking.  He doesn't cook dinners that often, but when he does, it's generally a variation of fried rice.  He was the one who introduced me to it as something you could make yourself.  Here is a vegetarian version, but he likes adding bacon or chicken (though between the eggs & edamame adding extra protein shouldn't be a concern).  I try to keep it healthy by using brown rice, lots of veggies, and as little oil and soy sauce as I can stand.  Though I pretty much always end up using all my daily allotted sodium and then some whenever I have fried rice.

Vegetable Fried Rice
4 tablespoons olive oil
1/3 cup onion
2 eggs
1 cup mixed frozen veggies
1 cup frozen broccoli
1/2 cup frozen edamame beans  --these are soybeans and are a very healthy source of protein (more detail below)
2 cups cooked brown rice
light sodium soy sauce to taste

1. If you're like me you'll have to start off by cooking yourself some rice.  One of these days I'll plan ahead and actually have leftover rice that I need to use and make fried rice the traditional way.

2. I put the frozen veggies in the pan with no oil and cover it with a lid and let the veggies steam themselves for a few minutes.  When they're done put them on a plate and cover it with a pot lid to keep them warm while you cook the rest. (Technically the frozen edamame should be cooked in a boiling pot of water for several minutes, but I don't bother because I'm lazy.  Warning: the lazy methods leads to the edamame being mildly crunchy.)

3. Now it's time to cook the eggs.  Scramble the 2 eggs and cook them with the onion in 1 tbsp olive oil.

4. When the eggs are done, add the veggies back into the pan along with the cooked rice.  Add 1 tbsp olive oil and soy sauce to taste.  Mix it all around and cook it for a few more minutes.

 This isn't nearly enough soy sauce. For me.  I add more on my plate.  My boyfriend has more sodium self-control than I do.

*Edamame Info:  You can buy it at Target.  For some reason the Archer Farms calls the shelled version (trust me, you don't want to deal with the shells) mukimame, but it actually is edamame. Look:

Thursday, September 23, 2010

Emergency Dessert - Jell-O Custard


The other night I needed dessert.  No, I'm sorry, I should make that clearer.  I NEEDED DESSERT.  It was 10pm and we didn't have anything readymade in the house.  I'm trying to have a new rule:  If I eat dessert I need to make it myself.  That way I have to put some effort into it and I can try to reduce the butter and sugar and I know what's in it.  Restaurant desserts can have 1,000 calories and you have no clue. And storebought desserts generally have high fructose corn syrup and a million ingredients I can't pronounce.

But it was 10pm, so making chocolate cookies like I wanted to wasn't very reasonable.  So I went looking through our pudding mixes.  I saw a Cook 'N' Serve custard.  I instantly knew I would make that since I had just read about Blackberries with Sweet Cream on The Pioneer Woman's site hours earlier.  Jell-O custard with thawed blueberries and strawberries mixed in was as close as I could get.  Sadly I had to let it sit in the fridge for an hour so I was eating dessert at about 11:30 at night.  Let's just say I'm having trouble with #1 on my 25 Before 25 List (lose 25 pounds).

Also, I don't have any cute little ramekins (I live a deprived life) to put the custard in because I am living in my first real apartment (post-college aka non-furnished) and my kitchen supplies leave a lot to be desired.  But never fear!  I DO have wine glasses from the dollar store!  (Really they're glass!  The dollar store is actually a sweet place to buy dishes.)

*Berries were mixed in after the custard had cooled.

Broccoli Cheese Pasta FAIL

At Target this week I treated myself to some delicious, fancy, & expensive cheeses.   I bought some smoked gouda and creamy havarti.  I used some of it in my Fancy Grilled Cheese and then I used more of it in a broccoli cheese pasta that I invented myself.  However, it didn't go well enough for me to share the recipe with anyone.  I tried to make a cheese sauce......and it failed pretty epicly.  My boyfriend and I ate it anyway (with sundried tomatoes!  Lately I've been throwing them in to everything I can) and it tasted pretty good.  But all I'll do is show you a picture:

*Please note how it looks like there is no cheese in the bowl.  This is because instead of being a sauce that coated everything as I had planned, the cheese stayed in chunks that are hidden in that shot.

I also made Incredibly Delicious Cheese Garlic Bread to go with it that certainly did not fail.  It was indeed incredibly delicious.  Though after making it, I think calling it "Cheese Garlic Butter Bread" is a more fitting name.  I ate the leftovers for my lunch today.  No, not the pasta leftovers.  The garlic bread leftovers.

Behold!:

Wednesday, September 22, 2010

The Wonderful World of Biscuits

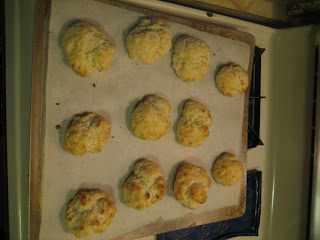
I baked these in muffin tins, not realizing that they would then look like muffins and not biscuits.  Lesson learned!

I happened upon this recipe the other day and I am soooo glad that I did!  I had completely forgotten about the existence of biscuits.  They are now one of my favorite things because there is no rising involved.  So it's a quick yummy side dish for dinner.


For the first time I actually bought buttermilk instead of adding vinegar to milk as a substitute.  I'm planning on using the leftover buttermilk for some yummy pancakes this weekend.  Unfortunately I couldn't find scallions or leeks at my Super Target so I had to leave them out.  They definitely would complement these biscuits very well though and I need to make sure I have some next time I make the biscuits.


These also help me on my quest to finish off a large container of freshly ground corn meal that my parents bought for me.  We went on vacation and stopped by a small mill that ground the corn in front of you.  I promised them if they bought it I would use it all.  It's been over a year and I have a lot left to use.  So you'll hopefully be seeing several cornmeal recipes in the future on this blog.

If you like cheesy things please make these!  As you bite into it or pull pieces off of the biscuit you can see the oozey strings of cheese inside.  YUM!


Cheddar Buttermilk Biscuits

1 3/4 cups all-purpose flour
3/4 cornmeal
4 teaspoons baking powder
1 teaspoon baking soda
1 teaspoon salt
1/2 stick (1/4 cup) butter (or use salted butter and omit the salt like I did)
2 cups extra sharp cheddar cheese
4 teaspoons grated parmesan cheese
3 scallions, fine chopped
2 garlic cloves, minced
1 1/3  cups well shaken buttermilk

  1. Place the oven rack in middle position and preheat oven to 450°F. Line 1 large baking sheet with parchment paper.
  2. In the bowl of a stand mixer fitted with the paddle attachment, add flour, cornmeal, baking powder, baking soda, and salt. Add the butter and toss with a fork to coat with the flour mixture. Mix on medium-low speed until the texture resembles coarse cornmeal, with the butter pieces no larger than small peas. Stir in cheeses, scallions and garlic. Hand stir the buttermilk into the mixture until just combined.
  3. Drop dough in 12 equal mounds about 2 inches apart on baking sheet. Bake until golden brown, 13-15 minutes. Transfer to a wire rack and cool about 10 minutes before serving.
Later this week I am going to make these plain buttery biscuits to go with White Bean Spinach soup.

Tuesday, September 21, 2010

Fancy Grilled Cheese


This may be one of the most delicious things I have ever made in my life.  I was very sad when I finished eating this sandwich at lunch today.  Please make this sandwich whenever you happen to have some leftover pesto!


Fancy Grilled Cheese

  • shredded smoked gouda
  • shredded havarti
  • basil pesto (see my recipe below)
  • sundried tomatoes (mine were not packed in oil)
  • your choice of bread (I like Arnold Sandwich thins because the bread is thin enough for the cheese to actually melt without using a sandwich press)


1. Spread one piece of bread with the pesto.

2. Stick the sundried tomatoes into the pesto so they don't fall off when you flip the piece over.

3. Spray your frying pan with Pam.  Put the second piece of bread in the pan and sprinkle it with both kinds of shredded cheese.  Place the pesto bread on top of the cheese and start cooking your delicious wonder.


I ate my grilled cheese with pita chips* and homemade hummus.  I'll post that recipe with pictures next week.

*Costco sells Stacy's pita chips for only $5.49 for a giant bag.  My boyfriend and I eat pita chips regularly and go through 2 giant bags a month.  Thank god for Costco!

Basil Pesto
*based off of this recipe

1 1/2 cups basil
2 large garlic cloves
1/4 cup diced up unsalted almonds
1/4 cup grated parmesan cheese
1/8 cup lemon juice
1/8 cup olive oil

sugar to taste, based on individual basil bitterness

Put everything, except sugar, in your food processor and blend.  Taste your pesto and if it's bitter add a bit of sugar and mix again.  Keep going until it tastes right to you.

I've noticed when I use my homegrown basil I don't need to add any, but when I use store bought I have to add what seems like tons of sugar.

Most pesto recipes include pine nuts.  I have never actually bought pine nuts and have always used unsalted almonds.  This is because one day several years ago I bought a big bag of unsalted almonds from Costco.  Then I found out that I do not like almonds when they are unsalted.  So I am slowly using the bag up as I make pesto.

Monday, September 20, 2010

25 Before 25

I was inspired by Making It Lovely's 30 Before 30 List and made my own.  I have about a year and a half to do all of these.  Every time I cross one of my list I'll do a post about it.  


1. Lose 20 pounds
2. Keep the weight off!
3. Run a 5k without stopping to walk
4. Leave the country again
5. See the redwood forest
6. Sew a piece of clothing for myself
7. Sew a piece of clothing for both of my nephews & my niece (D- a cape, M- a dress, E- monkey Halloween costume)
8. Finish my Snuggie project
9. Make my nephew D.'s tooth pillow Done!
10. Make Dad's quilt
11. Finish trim on my first quilt  
12. Make my purple quilt
13. Go camping in a tent again
14. Dress at a reenacting event again
15. Make a full Indian dinner from scratch
16. Find the perfect sugar cookie recipe
17. Find the perfect homemade cake frosting recipe
18. Have a window garden
19. Pay off my car loan
20. Make a niece & nephews photo album
21. Read 52 books (1.The Alchemyst  2.HP & the SS  3.HP & the CoS  4.HP & PoA  5.HP & GoF 6. HP & OotP 7. HP & HPB 8. HP & DH 9. The Girl With the Dragon Tattoo 10. The Girl Who Played With Fire 11. Farmer Boy 12. The Girl Who Kicked the Hornet's Nest)
22. Donate a large of sum of money to a charity (several hundreds of dollars)
23. Caption my New Zealand photo albums24. Get good at applying eye makeup
25. Learn how to cook with tofu

Easy Yummy Dinner

*I forgot to take a picture of my casserole, so here is one off of food.com


I thought I'd share what I made for dinner tonight because it was easy, yummy, healthy, and I got 4 dinner servings & 2 lunch servings out of it.  Also, it is made of cheap ingredients, which is always a plus.  I modified this food.com recipe.

Mexican Vegetarian Casserole

2 cups cooked rice
1 can (15 oz) black beans, drained & rinsed
1 can (15 oz) corn, drained
1 (8 oz) carton light sour cream - I mixed it in, but I'm considering leaving it out next time and using it as a topping
1 cup salsa
1 1/2 cups reduced fat shredded cheese - I used a pre-shredded mexican blend
1/3 cup chopped onion
sprinkle of cayenne pepper, depending on how spicy you want it
sprinkle of taco seasoning, depending on how spicy you want it
1/2 cups reduced fat shredded cheese to sprinkle on top
1 can black olives for topping
tortilla chips for a crunch while you eat : )

1. Preheat oven to 350.  


2. Mix the first 9 ingredients together in a large bowl.  


3. Spray the casserole dish/es with Pam.  


4. Spread the mixture into the dish and sprinkle with 1/2 cup of shredded cheese.  (I used a 5x9 casserole dish and an 8x8 casserole dish. I cooked one and put the other in a freezer for another night. I covered it with foil, pressing it down so that the foil actually touched the food and then put it in a freezer bag or put the dish's lid on it).  

5. Bake for at least 25 minutes, or until the liquid is cooked off or you will end up with a very soupy dish (your liquidiness will vary based on your salsa, sour cream, etc).  Serve with olives, (sour cream if you didn't mix it in), and tortilla chips.  The chips add a nice crunchy texture to the smoothness of the casserole.

6. When you cook the frozen one it will take longer than 25 minutes.  (I haven't done this yet so I'm not sure, just keep checking for the top to be a bit brown and the liquid to have bubbled away).


My boyfriend and I each ate dinner and there is enough leftover for one lunch.  And this was only half the recipe!  The other half is in the freezer for next week.

Kit Kat Crafting

*Me during my study abroad trip to New Zealand in 2007.  I am on a day cruise on Milford Sound.

Welcome to my blog!  I called it Kit Kat Crafting because Kit Kat is one of my older brother's nicknames for me.  So to clarify, this is not a blog about Kit Kats the candy.  Although here is a link to how to make your own giant Kit Kat.

I'll be posting yummy recipes along with pictures of my sewing crafts for the most part.  Anything crafty goes : )